Contact your insurer immediately after ensuring safety. Document all damage with photos and videos. Provide your policy number and damage details. An assessor will inspect your property within days to weeks. Your insurer will then approve repairs or offer a cash settlement based on your policy coverage.
- Step 1 — Ensure Safety First
- Step 2 — Document the Damage Thoroughly
- Step 3 — Contact Your Insurer Quickly
- Step 4 — Assessment and Your Insurer’s Response
- Step 5 — Settlement Options
- Step 6 — After Settlement: Follow-Up and Complaints
- Conclusion
- FAQs
- Does my home insurance cover food spoilage after a storm?
- Can I claim temporary fencing or security costs after storm damage?
- What if I can’t get a contractor to give quotes quickly after a major storm?
- Will my premiums increase after a storm claim in Australia?
- Can I claim mould damage caused days after the storm?
Storm season hits Australia hard. One minute your home is fine. The next you’re staring at broken tiles, smashed windows, or water pooling in your lounge room.
Filing a home insurance claim storm Australia doesn’t have to add to your stress. You need a clear plan — from the moment the wind stops to the day your repairs are done.
This guide walks you through every step of making a storm damage claim. You’ll learn what to document, how to talk to your insurer, and what to expect during assessment and settlement.
Step 1 — Ensure Safety First
Don’t rush outside the second the storm passes. Check for hazards first.
Downed power lines, unstable trees, and structural damage can all cause serious injury. If you see sparking wires or major structural problems, call 000 immediately. Contact the SES if you need emergency help with tarps or boarding up windows.
Once emergency services clear the area, you can start preventing further damage. Tarp exposed roofs. Board broken windows. Move furniture away from leaks. But here’s the crucial part — take photos before you touch anything.
Watch out for “disaster chasers” too. These unlicensed contractors knock on doors after storms offering quick repairs. They often do shoddy work that can invalidate your claim. Always go through your insurer’s approved repair network instead.
Your safety comes before paperwork. But once you’re safe, documentation becomes your priority.
Step 2 — Document the Damage Thoroughly
Your phone becomes your most important tool now. Take photos and videos of everything.
Photograph damaged roofs from multiple angles. Capture broken windows, cracked walls, and water stains. Film walk-throughs of each affected room. Show wet carpets, damaged ceilings, and any ruined belongings.
The more documentation you have, the stronger your claim. Include close-ups and wide shots. Date-stamp everything if your phone allows it. If you took photos of your home before the storm, dig them out — “before and after” comparisons carry weight.
Write down details as you go. Note which rooms are damaged, the size of affected areas, and what type of damage you see. Keep damaged items where possible, unless they’re hazardous. If you must throw something out, photograph it first and note serial numbers or save receipts.
Did you do any emergency repairs to stop further damage? Record those too. Take photos before and after you put up tarps or boards. Keep receipts for materials. Most insurers cover reasonable “make-safe” costs, but you need proof.
Time-sequenced documentation matters. The clearer your timeline, the smoother your claim process.
Step 3 — Contact Your Insurer Quickly
Ring your insurer as soon as you’ve documented the damage. Don’t wait until you have every detail sorted.
Most major insurers offer multiple contact options. Use their app if they have one — you can often upload photos directly. Check their website for online claim lodgement. Or call their claims hotline if you prefer speaking to someone.
Have your policy number ready before you make contact. Be prepared to explain when the storm hit and what damage occurred. Don’t worry if you don’t know the full extent yet. Initial reports can be general.
Ask these critical questions when you lodge your claim: What’s my excess amount? Do you offer temporary accommodation if my home is unlivable? Do you have preferred repairers I should use? How long will assessment take?
Write down the claim reference number they give you. Note the name of whoever you speak to. Keep a record of every interaction with your insurer from this point forward.
The faster you report damage, the faster your claim moves through the system. Many insurers prioritise claims based on when they were lodged.

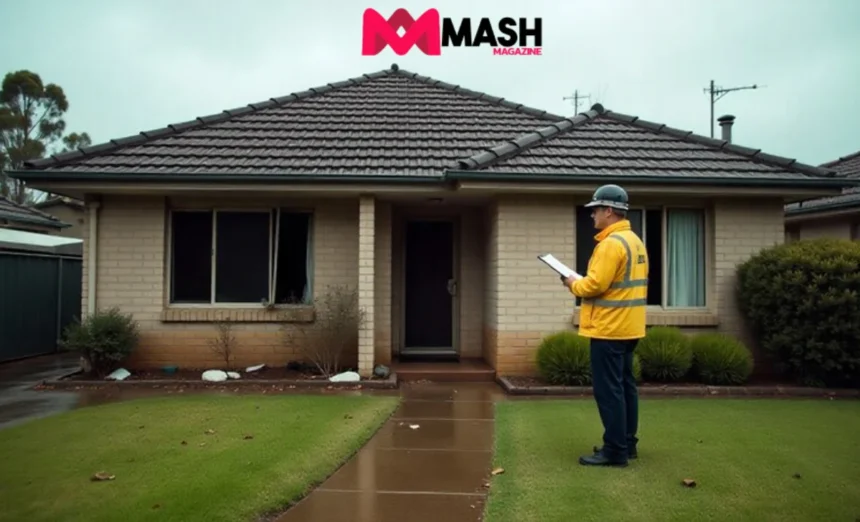
Step 4 — Assessment and Your Insurer’s Response
Your insurer will send someone to assess the damage. This might be a loss adjuster, an assessor, or even an engineer for serious structural issues.
The assessment can happen on-site or virtually, depending on the damage severity. On-site visits usually occur within days to weeks after you lodge your claim. Virtual assessments use your photos and videos if the damage is minor or if there’s a backlog of claims.
Be home during the assessment if possible. Walk the assessor through everything. Point out damage they might miss. Answer their questions honestly.
Your insurer should make a decision within about four months. Complex claims involving structural engineers or specialist reports can take longer.
If your claim is denied, your insurer must explain why in writing. They need to provide any reports they used to make the decision. They also have to tell you how to appeal if you disagree.
Sometimes insurers request external expert reports. This is normal for major damage or when the cause isn’t clear. It doesn’t mean they’re trying to reject your claim.
Stay in regular contact during this phase. Check in weekly if you haven’t heard anything. Document every conversation.
Step 5 — Settlement Options
Once your claim is approved, you’ll receive a settlement offer. This comes in different forms.
Cash settlements give you money to arrange your own repairs. You find contractors, get quotes, and manage the work yourself. This option offers flexibility but puts all responsibility on you. You need to hire licensed builders and get council approvals where required.
Insurer-arranged repairs mean your insurer organises everything through their preferred builder network. They provide a “scope of works” document detailing what will be fixed. Review this carefully. Check which contractors they’re using. Verify the materials specified. Confirm any council approvals needed.
Some insurers let you choose your own builder from their approved list. This sits between the other two options — you have some choice, but the insurer still oversees the work.
Cash payouts carry risks. Repair costs can blow out. Your quote might fall short. Be realistic about pricing and keep detailed records of all spending.
Check if your policy includes temporary accommodation cover. If your home is unlivable, your insurer might pay for you to stay elsewhere during repairs. This isn’t automatic — you need to ask.
Settlement amounts depend on your policy type. Replacement cover pays to rebuild or repair to the same standard. Indemnity cover accounts for wear and tear, paying less for older items.
Step 6 — After Settlement: Follow-Up and Complaints
Settlement isn’t always the end of the story. Keep all your paperwork after repairs are done or you receive payment.
Save invoices from builders. Keep assessor reports. File receipts for every expense. These documents protect you if problems emerge later or if you need to prove completed work.
Inspect repairs thoroughly once they’re finished. Check that everything in the scope of work was done properly. Test that the windows seal correctly. Verify roof repairs don’t leak. Make sure paint matches and finishes are even.
If you’re unhappy with repairs or how your insurer handled the claim, you can ask for a review. Contact your insurer’s complaints team first. Explain clearly what went wrong and what you want fixed.
The General Insurance Code of Practice sets out your rights as a policyholder. Your insurer must follow this code. If they don’t respond properly to your complaint, you can escalate to external dispute resolution through the Australian Financial Complaints Authority.
Serious delays or poor handling also justify complaints. Document everything if you go down this path. Having a clear timeline of events strengthens your case.
Some repairs come with warranties. Check what your builder or insurer guarantees. If defects show up months later, you might still have options.
Conclusion
Making a home insurance claim storm Australia feels overwhelming when you’re dealing with damage. But following these steps makes the process manageable.
Act fast once the storm passes. Document everything thoroughly before you clean up. Contact your insurer immediately and stay in regular touch throughout the assessment. Review settlement options carefully and keep all paperwork after your claim closes.
Storm damage is stressful enough. Don’t let the claims process add to it. Check your policy now so you know exactly what storm damage your cover includes. The more prepared you are, the smoother your claim will be.
FAQs
Does my home insurance cover food spoilage after a storm?
Some insurers cover fridge and freezer contents if the storm caused a power outage. Check the “contents insurance” section of your policy.
Can I claim temporary fencing or security costs after storm damage?
Yes, many policies allow claims for temporary safety measures if your home is exposed. Always keep receipts.
What if I can’t get a contractor to give quotes quickly after a major storm?
Insurers usually understand delays during peak storm season. Notify them in writing and upload whatever quotes you have.
Will my premiums increase after a storm claim in Australia?
It depends on the insurer and your area. Some insurers raise premiums in high-risk regions even if everyone claims after the same event.
Can I claim mould damage caused days after the storm?
You can only claim mould if you took reasonable steps to dry your home and prevent further damage. Insurers don’t cover neglect or delayed action.